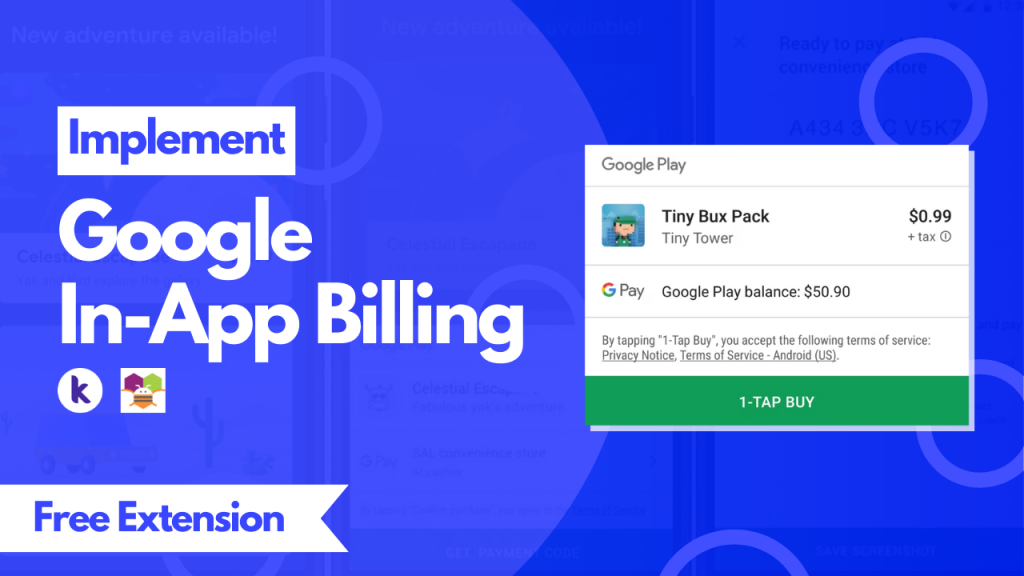
In today’s mobile app ecosystem, monetization is a crucial aspect for developers to sustain and grow their businesses. While many apps offer free downloads, generating revenue through in-app purchases has become a common practice. To facilitate this process, Google provides a powerful tool called In-App Billing, which allows developers to sell digital goods and services directly within their apps.
In this comprehensive guide, we’ll explore the InAppBilling extension, its features, and how to leverage it to offer a seamless in-app purchase experience for your users.
Table of Contents
Understanding the InAppBilling Extension
The InAppBilling extension is a powerful tool that simplifies the integration of Google’s In-App Billing system into your AppInventor projects. With this extension, you can sell digital products (consumable or non-consumable) and subscriptions directly within your app, providing a convenient and secure way for users to make purchases.
The extension offers a wide range of methods and events that allow you to handle various aspects of the in-app purchase process, such as establishing a connection with the billing client, retrieving product and subscription details, launching purchase flows, consuming purchases, and querying purchase history.
Getting Started with Google’s In-App Billing
Before you can start selling in-app products, you need to set up your app for in-app purchases. Here are the initial steps:
- Sign up for a Google Play Developer account: If you haven’t already, create a Google Play Developer account. This is required to publish your app on the Google Play Store and manage in-app billing.
- Set up app licensing and app signing: Ensure that your app is properly licensed and signed with a valid key. This is crucial for secure in-app billing integration.
- Configure in-app products in the Google Play Console: Log in to the Google Play Console and navigate to your app’s page. Under the “In-app products” section, you can create and manage your in-app products, including consumable items (e.g., virtual currency, game hints), non-consumable items (e.g., premium features, ad removal), and subscriptions.
Setting up the InAppBilling Extension
Before you can start implementing in-app purchases, you’ll need to set up the InAppBilling extension in your AppInventor project. Here’s how you can do it:
- Open your AppInventor project and navigate to the “Extensions” section.
- Click on the “Import Extension” button and search for the “InAppBilling” extension.
- Once found, click the “Import” button to add the extension to your project.
After importing the extension, you’ll have access to its blocks, properties, and events, which you can use to build your in-app purchase functionality.
Optional: Enabling or Disabling Test Mode
The InAppBilling extension provides a “TestMode” property that you can set to enable or disable test mode. Test mode allows you to test your in-app purchase implementation without actually making real purchases.

Set either “true” or “false” depending on whether you want to enable or disable test mode.
Once you’ve thoroughly tested your in-app purchase implementation, you can proceed with deploying your app to the Google Play Store, ensuring that all necessary configurations and settings are in place for in-app purchases to function correctly.
Establishing a Connection with the Billing Client
The first step in implementing in-app purchases is to establish a connection with the billing client. This is achieved using the “StartConnection” block provided by the InAppBilling extension.

This block initiates the connection process asynchronously, and once the connection is established, the “ConnectionSuccessful” event will be triggered. If the connection fails for any reason, the “ConnectionFailed” event will be called with an error message.
Retrieving Product and Subscription Details
Before you can offer products or subscriptions for purchase, you’ll need to retrieve their details from the Google Play Store. The InAppBilling extension provides two methods for this purpose: “GetProduct” and “GetSubscription”.
To retrieve product details, use the following block:
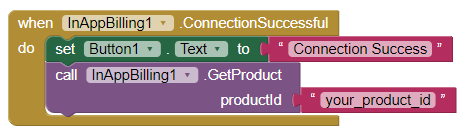
Replace “your_product_id” with the actual product ID you want to retrieve details for. Upon successful retrieval, the “GotProduct” event will be triggered, providing you with information such as the product’s title, name, description, and price.
Similarly, if you want to retrieve subscription details, use the “GetSubscription” block:
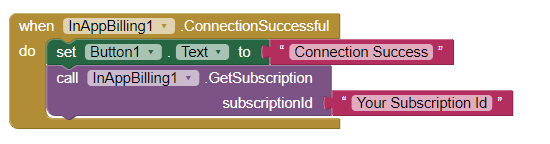
Replace “Your Subscription Id” with the actual subscription ID you want to retrieve details for. The “GotSubscription” event will be triggered with relevant subscription information, including the subscription name, title, description, price list, offer tokens, offer IDs, and base plan IDs.
Launching Purchase Flows
Once you have the necessary product or subscription details, you can initiate the purchase flow using the “LaunchProductPurchase” or “LaunchSubscriptionPurchase” blocks.
For product purchases, use the following block:
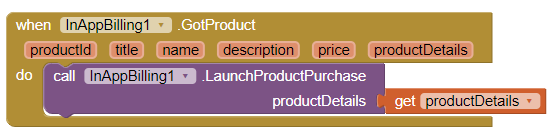
Replace “productDetails” with the actual product details obtained from the “GotProduct” event. Upon successful launch, the “ProductPurchaseLaunched” event will be triggered.
For subscription purchases, use the following block:
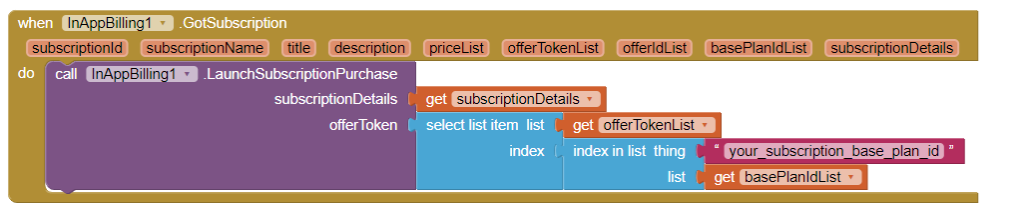
Replace “subscription_details” with the actual subscription details obtained from the “GotSubscription” event, and “offer_token” with the desired offer token. Upon successful launch, the “SubscriptionPurchaseLaunched” event will be triggered.
Consuming Purchases
For consumable in-app products, you’ll need to consume the purchase after the user has successfully made a purchase. This is done using the “ConsumePurchase” block:
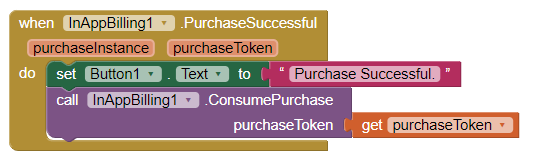
Replace “purchaseToken” with the actual purchase token obtained from the “PurchaseSuccessful” event. Upon successful consumption, the “ProductConsumedSuccessfully” event will be triggered.
Querying Purchases and Purchase History
The InAppBilling extension also provides methods for querying current purchases and purchase history. To query current purchases, use the “QueryPurchases” block:
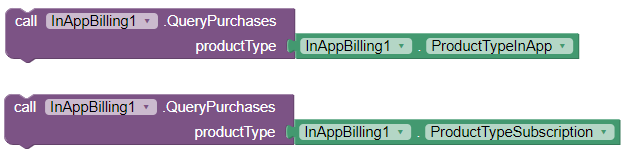
Replace “product_type” with either the “ProductTypeInApp” or “ProductTypeSubscription” property, depending on the type of purchases you want to query. Upon successful query, the “QueryPurchasesSuccess” event will be triggered with a list of purchases and the response.
To query purchase history, use the “QueryPurchasesHistory” block:

Replace “product_type” with either the “ProductTypeInApp” or “ProductTypeSubscription” property, depending on the type of purchase history you want to query. Upon successful query, the “QueryPurchaseHistorySuccess” event will be triggered with a list of purchase records and the response.
Handling Purchase Acknowledgment
For some types of purchases, such as subscriptions, you may need to acknowledge the purchase after it has been successfully made. This can be done using the “AcknowledgePurchase” block:
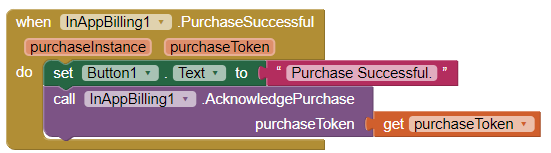
Replace “purchase_token” with the actual purchase token obtained from the “PurchaseSuccessful” event. Upon successful acknowledgment, the “AcknowledgeSuccessful” event will be triggered.
Conclusion
Implementing in-app purchases in your AppInventor projects has never been easier thanks to the InAppBilling extension. By following the steps outlined in this guide, you can seamlessly integrate Google’s In-App Billing system into your apps, offering your users a convenient way to purchase digital products and subscriptions.
Remember to thoroughly test your implementation, handle edge cases, and provide a smooth user experience throughout the purchase process. With the right approach and the powerful tools provided by AppInventor and the InAppBilling extension, you can unlock new revenue streams and take your app’s monetization strategy to the next level.